Basic Customizing Techniques

Here I will teach some of the things I have learned over the time I have been customizing,While I am still learning new things and techniques I thought I would share some of the things I feel I have mastered.
Tools Needed
Before we get started there are some tools you will need.The items I list are what I use but please know that you can use whatever you have available to you or whatever works for you.These are just some basic tips and techniques and are no way written in stone. Every customizer does things his or her way, while some techniques and styles are similar, one thing we all learn is that we are all different. And you will also develop your own techniques in time.
Tools:
Drill, battery operated works best but you can use whatever you have.
Drill bits, I use a variety pack but the main drill bits I use are 1/16, 5/64, and 5/32.
Files, I use an assortment of files as well, round, flat,tapered. I use small jeweler type files.
Sandpaper, assorted grits ranging from 60 to 1500 for rough sanding to final wet/dry sanding.
Steel wool, a medium coarse grade of steel wool works well for smoothing your cast before priming.
Dremel tool, now this is optional but comes in handy for cuts, polishing and various other tasks.
Scroll saw, This is definately optional but comes in handy when making cuts in your cast.
Super glue, I use loctite control extra time.
Various exacto and razer cutters with standard cutting blades.
Masking tape, various widths of tapes for masking and marking cuts.
Bottle of Goof off, for opening blister packs.
This is the majority of tools and items I use throughout the process, but I am sure there are others that you can use.
Opening a blister pack cleanly for re use.

Select picture to go to this page
Now this is a simple technique I was taught to open Mainline Hot wheels (cards with bare cardboard backs) blister packs. If you plan on putting your custom back in it's original blister or save the blister to put on a custom card.
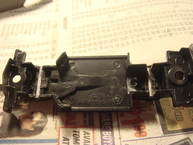
Drilling apart castings
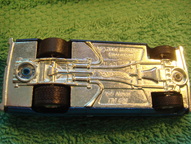
Select picture to go to this page
On this page I will show you how to easily and cleanly take your Hot wheels apart and prepare it to re- assemble.
Making axle tubes
select picture to go to this page
Tired of trying to find original axles that are the right length to fit your custom? Here I will show you how to make custom axle tubes so that you can put any wheels with axles on your cool custom..
